How To Install FreeBSD 10.1 On A 2006 Macbook

A while ago I decided to unretire my 2006 Macbook and turn it into a low powered server. Specifically to run a BBS, but more on that in a later blog post. To get FreeBSD running properly requires a bit of trickery, so i decided to write a little howo to save you some time and effort. For this you will need the following:

Perquisites

  • A FreeBSD install DVD burned with the i386 image as we're dealing with a 32 bit core duo machine here. If you're into that sort of think you can also create a FreeBSD USB stick.
  • The OS X Tiger (10.4) Install DVD

Now for the fun part:

  • Insert DVD/USB stick into Macbook and boot

  • Hold down the option key to choose to boot from the DVD/USB stick. The boot media should be displayed as "Windows" by the Mac boot manager

  • Install FreeBSD with default partitions and whichever options you want

  • With 10.1 I kept getting a

1
No bootable device -- insert boot disk and press any key

message on bootup. This can easily be fixed by exiting to the shell after the install and typing in

1
/sbin/gpart set -a active adaX

where adaX is the boot partition. I think this is ada0s1 on the Macbook with the default partition options, but i'm not 100% sure. Please feel free to correct me in the comments if i'm wrong.

  • Exit and reboot. While rebooting hold down the left trackpad button to eject the DVD. Obviously if you're installing from USB this shouldn't be an issue. Insert the OS X Tiger install DVD and reboot again.

  • Hold down the C button during the chime to boot from the Tiger DVD. Once booted choose your language and then open the terminal (Utilities/Terminal). Now you need to bless the boot partition (Yes, the engineers at Apple have quite the ego). Type the following in the shell:

1
bless --device /dev/disk0s1 --setBoot --legacy
  • Reboot again and you should be rewarded with the FreeBSD boot screen:

FreeBSD boot screen

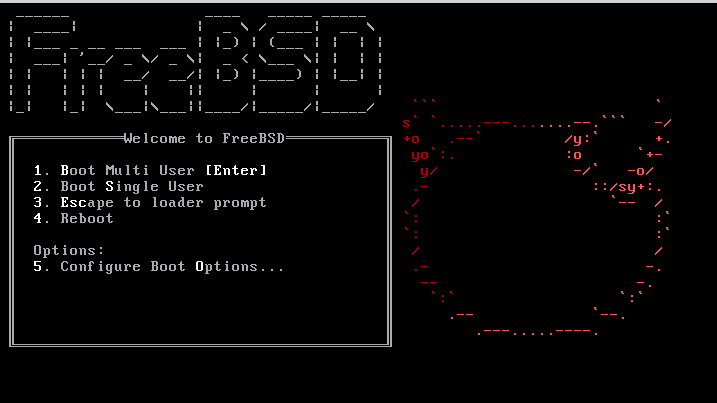
Now pat yourself on the back for a job well done. You deserve it.

Pat yourself on the back


This Blog Now Has Comments. Let The Bitching Commence

Thanks to the magic of Disqus all three of you human beings that know of the existence of this blog (thanks for the kind words) can now leave comments. Aren't you boys lucky! Hasten yourselves to acquire the much coveted "first post" honor.

Sadly as of the time of writing no t-shirts are available as prizes. The best I can offer is a special place in my thoughts, which should be a reward in and of itself. And of course bards will sing songs of your accomplishment for generations to come. You could very well be the man they called Jayne…


Yet Another Generic "Middleman Powers My Blog" Post

It's almost compulsory when someone starts a new static blog to post a "what powers this" article, and who am I to break tradition? So here goes.

The Engine

I've decided to use Middleman with the blog extension rather than Jekyll. After doing some research (ie googling Middleman vs Jekyll) a lot of people seemed to prefer the former over the latter.

As I had zero experience with static site generators I just decided to go with the flow (after all, when has that ever gone wrong) and am quite pleased with my decision. Despite having no Ruby experience at all setting everything up was pretty straightforward and uneventful.

Design

For the first version I decided to be a good developer and use Bootstrap as everyone else was using it. However in the mean time Foundation became the new cool kid on the block, so naturally i switched and haven't look back since.

Even though it's supposed to be minimal, even someone like me with the aesthetic skill of a colour blind accountant is able to build something presentable. Ripping off a the design of the blog template and a couple of sites slightly helped a lot too.

For the templating itself I switched from haml to slim as I found it a little less convoluted.

Hosting

At first I contemplated hosting this on the CloudVps Object Store as I already rent a vps from them and am quite happy with their customer support. Also they're significantly cheaper than Amazon S3. Then the cheap little dutch boy in me overpowered my reasoning and forced my hand to host on Github Pages as it's free. Setting up the github side of things is pretty much idiot proof.

Deployment

Middleman has a plugin to deploy to Github Pages, but rather than using that I decided to give Wercker a shot as I've heard good things and at the time of writing it's free. Setting up wercker to deploy your project to pages is pretty straight forward as well. The wercker.yml config the blog uses is pretty straightforward:

1
2
3
4
5
6
7
8
9
10
11
12
13
14
15
box: wercker/ruby
build:
    steps:
        # Execute the bundle install step, a step provided by wercker
        - bundle-install
        # Execute a custom script step.
        - script:
            name: middleman build
            code: bundle exec middleman build --verbose
deploy :
  steps :
    - lukevivier/gh-pages:
        token: $GIT_TOKEN
        basedir: build
        domain: higherlearning.eu

There isn't really much more to say. Hopefully in the future new articles will be a bit more technical and a little less explaining the painfully obvious and trivial.